Showing posts with label Cheese. Show all posts
Thursday, October 24, 2013
FFWD - Muenster cheese souffle ... sort of
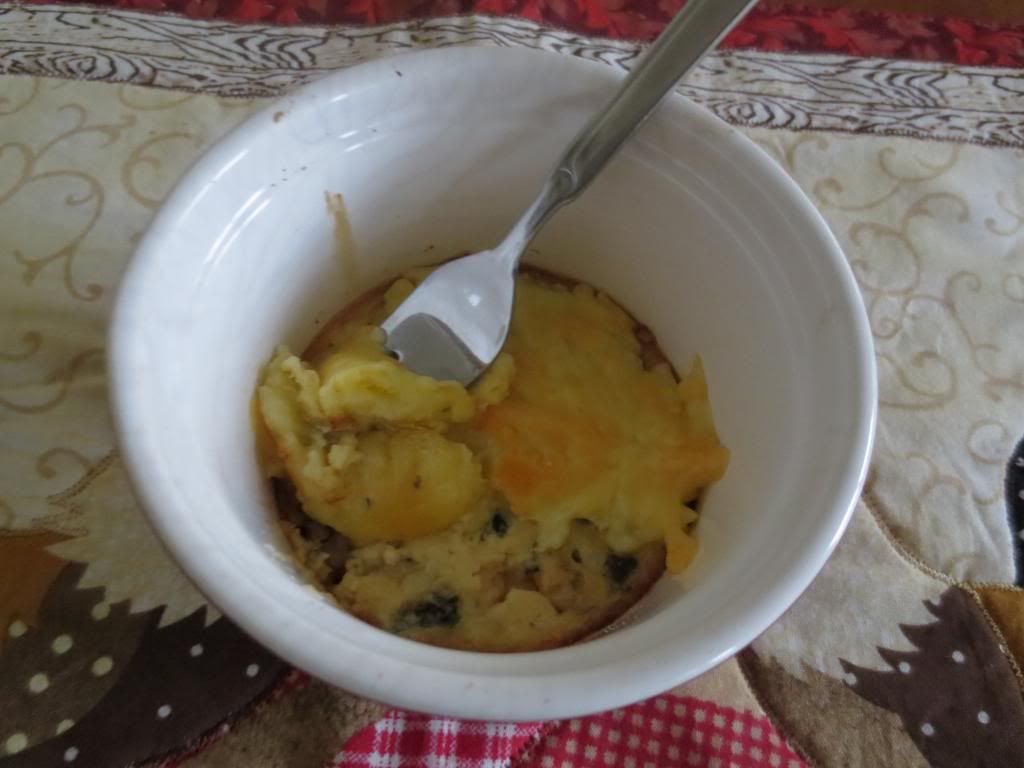
It's French Friday with Dorie time again, and this week's recipe is Muenster cheese soufflé. Now, to make a Muenster cheese soufflé, I figure you must use Muenster cheese - am I right? Umm, unfortunately, I didn't have Muenster cheese, so I used Devondale Light Cheddar Cheese. Hey, it's cheese!
I divided the recipe into a quarter so I could make one serve - as the proportions of ingredients are in odd volume measures, this was no mean feat. (Thanks to Kayte for my teeny tiny Oxo measuring cup.) Apart from my cheese choice, I also lightened this up by using margarine instead of butter, and using skim milk. I further thumbed my nose at the recipe by using black pepper - who needs two kinds of pepper in the house?
And you know what? This was delish. I served it for breakfast with a handful of baby spinach leaves (not pictured), and it was really good. The only hard part was waiting for 25 minutes for the soufflé to cook.
To see what the other Doristas thought of this recipe, visit the LYL section of the FFWD website.
Tuesday, April 9, 2013
WWDH - Spinach and ricotta cannelloni
This week's Wednesday with Donna Hay recipe was chosen by Kayte. It is Spinach and Ricotta Cannelloni from Modern Classics Book I, and can also be found online.
I have never made cannelloni before, so I found this to be an interesting recipe. It ended up being fairly easy to make, as Donna stipulates the use of fresh lasagne sheets into which the spinach and cheese filling is rolled up before being topped with bottled tomato pasta sauce.
Here is a peek at the insides:
This cannelloni is very tasty but quite rich - I couldn't eat the entire serving of two pieces, so divided the cannelloni up into one and half piece lots. I served my cannelloni with frozen veges dolloped with aubergine and chilli jam.
I would make this again - it was delicious.
To see what Kayte, Margaret and Chaya thought of this dish, visit their websites.
Thursday, March 7, 2013
FFwD - Cheesy Creme Brulee
This week's French Fridays with Dorie recipe is Cheesy Creme Brulee. To me, it tasted like a very small crustless quiche. This translates to - it tasted fine, but I can't really see the point.
I used gorgonzola in the base of my brulee, as that was the only block cheese I had. For topping, I used pre-grated cheddar.
There's not much else to say about this, I'm afraid. Have a lovely weekend, and check out the thoughts of the other Doristas on this dish at the LYL section of the website.
Wednesday, February 13, 2013
Double Chocolate Fudge Cheesecake for Valentines Day
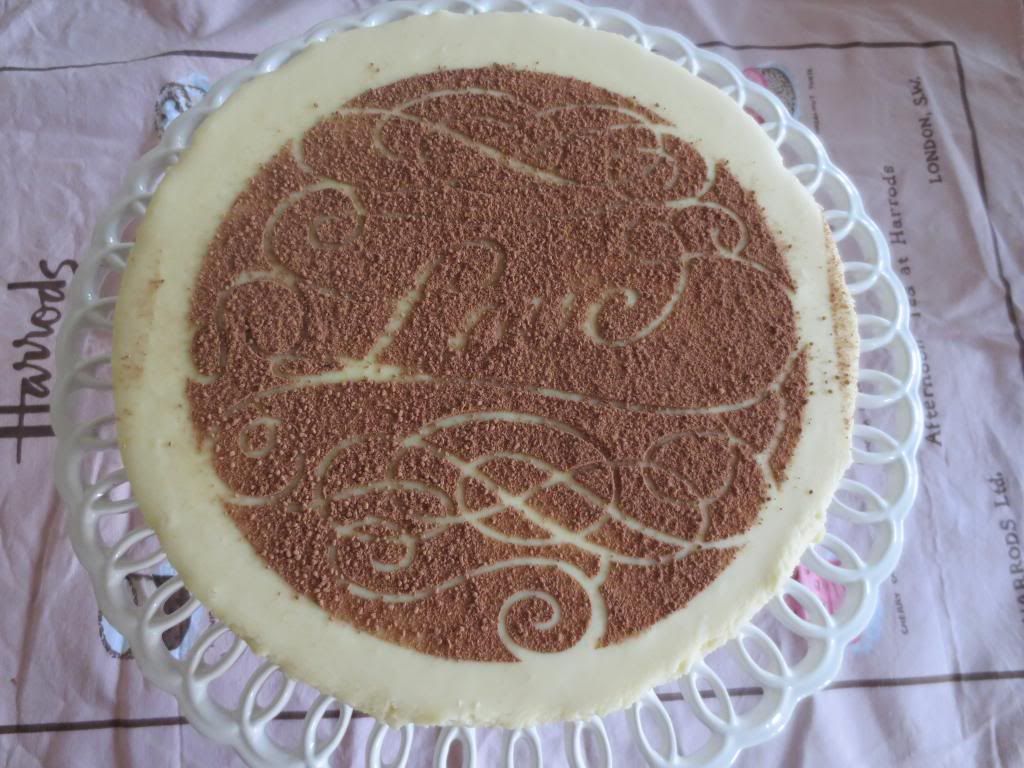
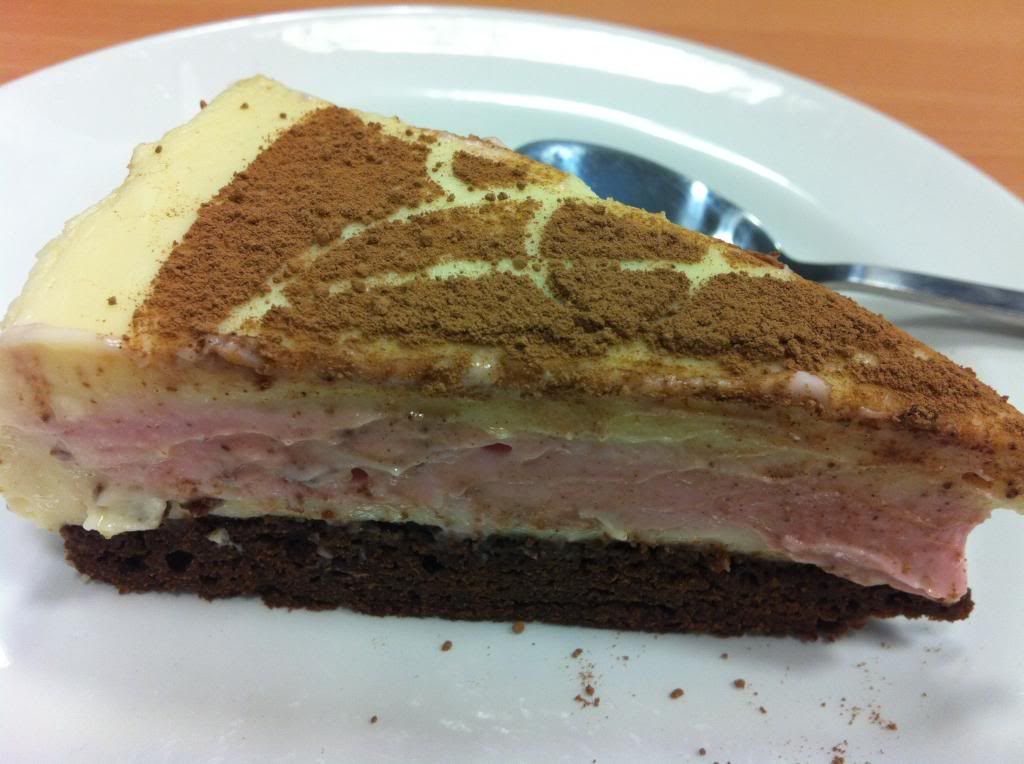
Happy Valentines Day!! For Valentines Day, I have made a glorious Double Choc Fudge Cheesecake by Michelle Southan from the February 2013 edition of Australian Good Taste magazine. Isn't it gorgeous? It is a chocolate brownie base, topped with white chocolate cheesecake, then raspberry cheesecake, then another layer of white chocolate cheesecake. Finally, it is stencilled with cocoa using the free stencil that came with the magazine. Bliss! And it tasted as good as it looks.
Here is a side view of the four layers:
Tempted? To make this cheesecake, you will need:
Base
60ml hot water
50g chopped dark chocolate
40g butter
2 tsp self-raising flour
2 tbs cocoa powder
1 lightly whisked egg
Preheat your oven to 160 degrees Celsius. Grease and line the base and sides of an 18cm springform pan as smoothly as possible with baking paper, so that the paper rises 2cm above the rim of the pan.
Heat the water, chocolate and butter in a microwave on high, stirring once every minute, until the chocolate melts and the mixture is smooth. (yes, this sounds like madness, but trust me, it works.) Add the sugar, flours, cocoa powder and egg and mix well. Pour into the prepared springform pan and bake for 30 minutes or until cooked through. Remove from the oven and allow to cool completely.
White chocolate cheesecake
500g cream cheese, at room temperature
100g sugar
125ml thickened cream
200g melted white chocolate
2 tsp vanilla
80ml boiling water
2 tsp gelatine
Raspberry cheesecake
100g thawed frozen raspberries
250g cream cheese, at room temperature
55g sugar
60ml thickened cream
2 tbs boiling water
1 tsp gelatine
To make the first layer of white chocolate cheesecake, beat together half the cream cheese and half the sugar until smooth. Beat in half each of the cream, melted chocolate and vanilla. Put half the water in a heatproof bowl and sprinkle over half the gelatine. Stir until the gelatine is dissolved, and allow to cool for 1 minute before beating into the cream cheese mixture. Pour the cheesecake mixture over the cooled brownie base, cover the top of the tin with cling film, and place the tin in the fridge for 1 hour to allow the cheesecake to set.
To make the raspberry layer, mash the raspberries in a bowl with a fork, then press the berries through a sieve and discard the seeds. Beat the cream cheese and sugar together until smooth, then beat in the raspberry puree and cream. Put the boiling water in a heatproof bowl and sprinkle over the gelatine, then stir until the gelatine has dissolved. Allow the gelatine mixture to cool for 1 minute, then beat into the cream cheese mixture. Pour the raspberry cheesecake over the white chocolate cheesecake layer, cover the top of the tin with cling film, and refrigerate for one hour to allow the layer to set.
Make the final white chocolate layer in the same way as the first, using the remaining white cheesecake ingredients. Pour the white chocolate cheesecake over the raspberry layer, cover the top of the tin with clingfilm, and refrigerate for 4-6 hours until set. (I refrigerated it overnight and the and the cheesecake was well set by morning.)
To serve, you can optionally place a pretty stencil lightly against the top of the cheesecake, and then dust over the top of it thoroughly with cocoa powder in a sieve. Remove the stencil carefully so as to preserve the pattern, then take the cheesecake to the table to wow your guests with its beauty. (I missed the latter part, as I was taking mine to work.) Cut into slices with a warm knife to serve:
This cheesecake is sweet, smooth and silky, and very dangerous to have in the house. By taking it to work, I could indulge in one decent sized slice, knowing that there would not be another, and enjoy it I did.
What are you doing for your beloved this Valentines Day, if you celebrate it?
Wednesday, December 19, 2012
Chocolate Chip Cheesecake
Last Sunday was Vlad's birthday, and in true work celebration fashion, I baked him a cake. Vlad is a cheesecake fiend, so the cake of choice was cheesecake.
I decided to go off the beaten track a little with this cheesecake. I didn't have any cream, so I had to choose a cheesecake without cream. I turned to the Australian Womens Weekly Bake cookbook, and found a plain baked cheesecake made without cream called the Bistro Cheesecake. Perfect!
I used chocolate ripple biscuits for the base instead of plain biscuits, exchanged the lemon zest for a cup of chocolate chips (which all sank to the bottom - oh well) and 2 tablespoons of Kahlua, and decorated the top of the cheesecake with ganache (after acquiring some cream!), white chocolate stripes and a fondant disc.
Here is a look inside the finished product (and no, I did not cut this poor battered slice):
But you get the idea. The cheesecake worked, and it tasted pretty good.
To make the basic cheesecake, you will need:
250g packet chocolate ripple biscuits
125g butter, melted
4 eggs
165g sugar
500g cream cheese
1 cup chocolate chips
2 tablespoons Kahlua
Preheat your oven to 160 degrees Celsius.
Place biscuits in a food processor and process to form fine crumbs. Add the melted butter, and process until combined. Press the mixture over the base and sides of a greased 20cm springform pan. Chill the base in the fridge while you make the filling.
Make the filling by beating the eggs in a small bowl with an electric mixer until thick and creamy. Beat the cream cheese in another medium bowl with electric mixer until smooth. Add the egg mixture to the cheese mixture, and beat until combined. (To be honest, I threw caution to the wind and added the chopped up cream cheese straight into the eggs and started beating. Luckily, it was a warm day and the cream cheese did beat into the eggs without little lumps speckling the mixture.)
Beat in the 2 tablespoons of Kahlua and fold in the chocolate chips. The mixture is liquid, so yes, the chocolate chips will sink straight to the bottom of the mixture.
Pour the cheesecake filling into the chilled biscuit base, and bake the cheesecake for 50 minutes until set and only slightly jiggly on top. (Mine took around 20 minutes longer.) Cool the cheesecake in the oven with the door ajar. Refrigerate for 3 hours or overnight.
I ended up with a small crack in the top of my cheesecake, and wanted to hide it, hence I made the ganache using 75g of dark chocolate and 50ml cream. Chop the chocolate finely and place it into a heat proof bowl. Boil the cream, then pour it over the chopped chocolate, and let the mixture sit for around 3 minutes before stirring until smooth. It will be quite a thick ganache, so spread it over the top of the cooled cheesecake.
Pipe melted white chocolate in stripes over the top of the ganache. My plan was to feather it, but it set too soon. Oh well. Make a name disc out of rolled fondant and pipe a name in chocolate on top. Glue the disc to the cheesecake with a dab of melted chocolate.
Serve and enjoy!
Thursday, March 15, 2012
FFwD - Cheese souffle
Thank God it's Friday! Today I have to give an external seminar presentation, which fills me with minor dread. These things always seem like a good idea at the time - then when it's crunch time, I wonder what on earth I was thinking. Paper done - check. Slides done - check. But the scariest part is turning up and having to present the paper in front of a room full of strangers of differing backgrounds, who may in fact know more than you about the topic you are presenting on. It's a little like the nightmare where you dream you have left the house without your pants on. There is also audience evaluation where you have to face the reality of what others thought of your presentation. So, it's just a little stressful for me today.
Compared with that, this week's cheese souffle for French Fridays with Dorie was a breeze. I have only made souffle once before, but I didn't really put much thought into the process, and it turned out fine. The roux for the bechamel, normally a nemesis of mine, went off without a hitch. It turned out so well that I did not even feel the need to strain the bechamel, as it seemed pretty smooth. Even when my last egg yolk broke and sneakily leaked a bit into my whites, I managed to fish it out and still get big fluffy whites. And as you can see from my photos, I got a souffle with a very fine quiff on top.
Now for some process photos. Here is the base bechamel:
This is the bechamel after being spiced, egged and cheesed (I used Swiss Gruyere):
This is the uncooked souffle in its dish ready for baking (yes, I was a little optimistic in hoping that it fitted in properly, and I did get some overflow):
And here is a peek at the yellow, billowy, soft centre underneath the golden brown crust:
It is always a little disappointing that the lovely high top is but a fleeting vision - but that's souffle for you. However, I captured the moment on film to dream about forever.
To see what all the other Doristas thought of this cheese souffle, visit the LYL section of the FFwD website. Have a great weekend!
Friday, September 23, 2011
Lemon and passionfruit cheesecake slice
I am a cheesecake fiend, but I avoid it as much as possible because I know that it will go straight to my hips. It is especially hard to avoid when I work near a cheesecake shop that sells cheesecake by the slice for $3.45.
As it has been a while since I made cheesecake, I thought it was time to lift the curfew and try out a recipe emailed to me by my Mum in 2004, and which until now I had not made. Her recipe is for lemon and passionfruit cheesecake. She probably got it out of a magazine, but its origins are lost in the fog of time.
This cheesecake is no-bake, making it super easy to put together. The base is also a crushed biscuit base, which means there is no pastry rolling either. It contains store bought lemon curd and tinned passionfruit pulp, and if you have a food processor to crush the biscuits, the whole thing is a breeze to put together.
The end result is a tangy, lemony cheesecake that is not at all heavy on the palate. As an added bonus, it is made in a slice tray, so that you cut it into neat little squares instead of wedges - so of course you can have more than one piece!
If this cheesecake sounds like your type of treat, you will need:
1 packet of sweet biscuits (I used gingernuts)
150g butter
1/2 teaspoon cinnamon
1 teaspoon vanilla extract
2 x 250g blocks of cream cheese
1 x 280g bottle of lemon curd
1 small tin of passionfruit
3 teaspoons gelatine (I used 4 teaspoons)
¼ cup hot water
Line a bar/slice tray with baking paper, and spray the baking paper with cooking spray.
Blitz the biscuits into breadcrumb size pieces in a food processor, or crush them with a rolling pin. Melt the butter, and pour it over the crushed biscuits. Add the cinnamon and vanilla, and combine well. Press the mixture into the prepared bar/slice tray and refrigerate while you make the filling.
Dissolve the gelatine in the water, and set aside to cool slightly.
Cut the cream cheese into cubes, then using an electric mixer, beat it until smooth. Beat in the lemon curd, followed by the passionfruit pulp and the gelatine. Pour the cheese filling over the chilled biscuit base, smooth the top with a spoon, and refrigerate over night or until set.
Cut the cheesecake into squares (~20) and serve chilled.
Thursday, August 18, 2011
Jamie Oliver's Spinach and Feta Filo Pie
No French Fridays with Dorie for me again this week - I have been very busy and just did not get a chance to make this week's Eggplant Caviar (a dip similar to baba ghanoush). If you'd like to see it, do visit the LYL section of the FFwD website.
Instead, I am posting an easy Spinach and Feta Filo Pie by Jamie Oliver from his smash hit cookbook, 30 Minute Meals. The recipe can be found online here. Jamie uses olive oil between the layers of filo instead of butter, which in my view makes it healthier. As well as spinach and feta, this pie contains toasted pinenuts for additional texture and flavour - don't skip them, as they really make the pie.
No special pastry skills are needed to make this - everything is just placed onto baking paper in a pie pan and the filo is folded over to cover the filling:
It is a fantastic light meal when served with some fresh cooked veges - in my case, cauliflower and beans.
Have a great weekend!
Labels:
Cheese,
Main courses,
Pies and tarts,
Vegetables
Subscribe to:
Posts (Atom)